
Introduction
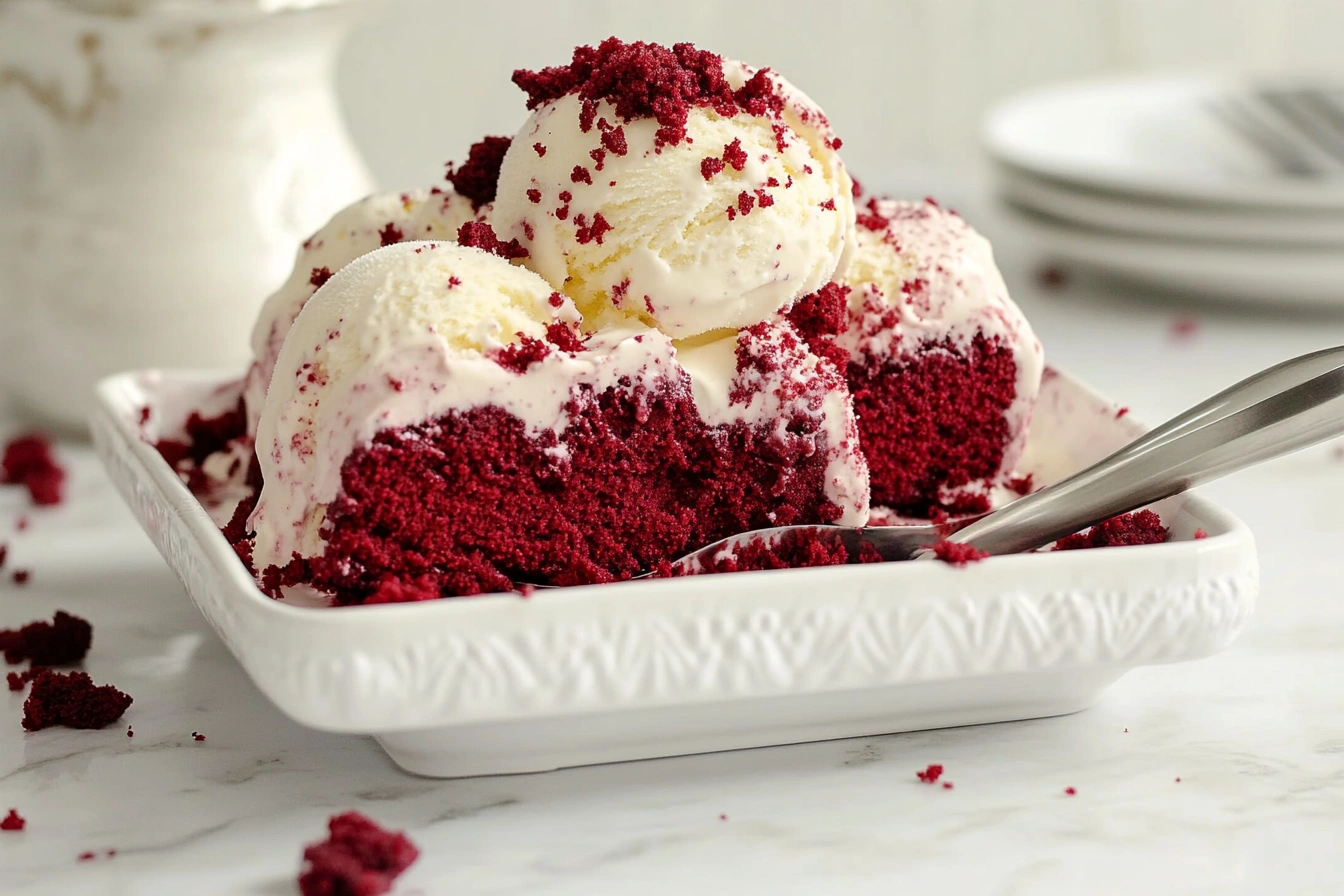
When it comes to indulgent desserts, few things can top the creamy decadence of red velvet cake ice cream. This delicious recipe combines the richness of red velvet cake with the smoothness of homemade ice cream, creating a treat that’s as stunning to look at as it is to eat. Whether you’re hosting a party, treating yourself, or looking for a unique dessert, this recipe has you covered. In this guide, we’ll dive into the step-by-step process of making red velvet cake ice cream, along with tips, variations, and expert techniques to perfect your creation.
Essential Ingredients for Red Velvet Cake Ice Cream
Gathering Ingredients for Red Velvet Cake Ice Cream
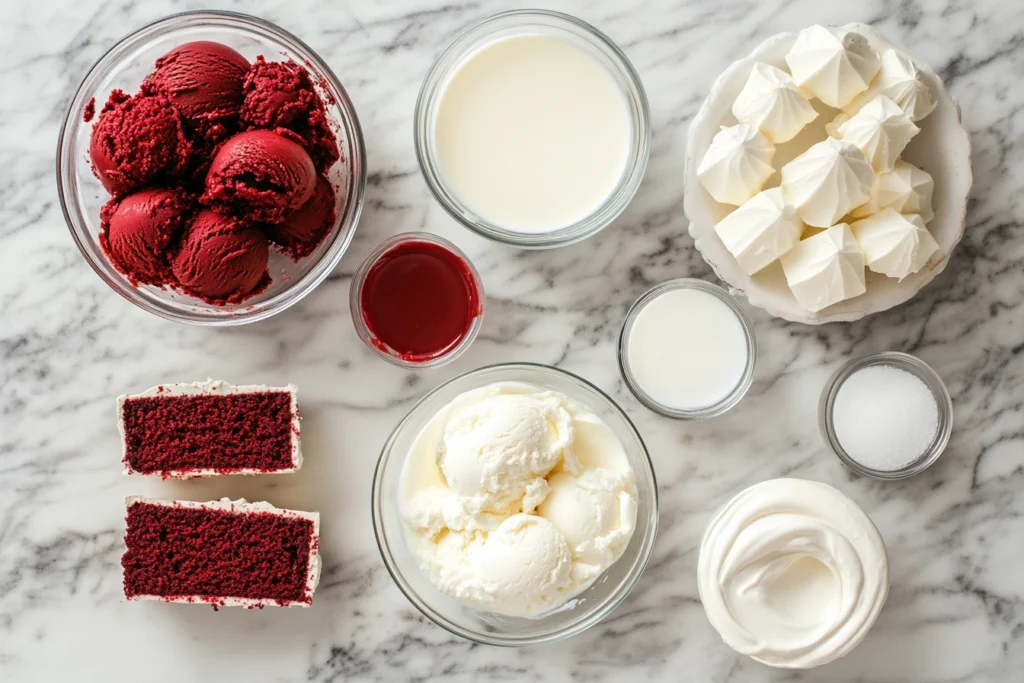
Creating the perfect red velvet cake ice cream starts with high-quality ingredients. Here’s what you’ll need:
- Creamy Base Ingredients:
- Heavy cream: Ensures a rich and creamy texture.
- Whole milk: Adds lightness and balances the creaminess.
- Granulated sugar: Sweetens the ice cream.
- Vanilla extract: Enhances the overall flavor.
- Red Velvet Cake Components:
- Red velvet cake: Bake your own or use store-bought. Make sure it’s moist and flavorful.
- Red food coloring: For that iconic red hue.
- Special Additions:
- Cream cheese: Adds a tangy twist reminiscent of the frosting on red velvet cake.
- Salt: A pinch to balance the sweetness.
For more inspiration on incorporating cream cheese into desserts, check out our guide to Cream Cheese-Stuffed French Toast.
Why Fresh Ingredients Matter
Using fresh and high-quality ingredients is essential to achieving the best flavor and texture in your homemade ice cream. Fresh dairy creates a creamier base, while moist red velvet cake ensures every bite is rich and satisfying.
Optional Extras for Creativity
- Chocolate chips or white chocolate chunks for added texture.
- Crushed cookies for a fun twist.
Preparing the Red Velvet Cake
Baking or Choosing the Perfect Red Velvet Cake
The red velvet cake is the star of this recipe, so it’s essential to get it just right. Follow these steps for a flawless cake.
Baking a Homemade Red Velvet Cake
- Ingredients Needed:
- All-purpose flour, cocoa powder, baking soda, and salt.
- Granulated sugar and buttermilk for moisture.
- Eggs, oil, red food coloring, and vanilla extract for flavor.
- Steps to Prepare:
- Preheat the oven to 350°F (175°C). Grease and flour your cake pans.
- Sift together the dry ingredients to ensure a lump-free batter.
- Whisk the wet ingredients, including the vibrant red food coloring.
- Combine wet and dry ingredients until smooth.
- Pour into the prepared pans and bake for 25–30 minutes or until a toothpick comes out clean.
- Cool the cake completely before crumbling it for the ice cream.
For another dessert option with a unique twist, explore our Tortilla Quiche Bake.
Using Store-Bought Red Velvet Cake
If you’re short on time, opt for a high-quality store-bought red velvet cake. Look for a moist texture and rich flavor that mimics homemade perfection.
Crumbling the Cake for Ice Cream
- Use a fork or your hands to crumble the cooled cake into small, bite-sized pieces.
- Set aside the crumbles in an airtight container until ready to mix with the ice cream.
Key Tips for the Cake Layer
- Even Crumbles: Ensure uniform pieces so they distribute evenly in the ice cream.
- Avoid Dry Cake: If your cake seems dry, lightly brush it with sugar syrup to restore moisture.
Preparing the Ice Cream Base
Creating a Creamy Ice Cream Base for Red Velvet Cake Ice Cream
The ice cream base is the foundation of this recipe, providing a rich, creamy texture to complement the red velvet cake.
Ingredients for the Ice Cream Base
- Heavy cream and whole milk for a creamy consistency.
- Granulated sugar for sweetness.
- Vanilla extract for added depth of flavor.
- Optional: Cream cheese for a tangy twist that pairs beautifully with red velvet cake.
Looking for another creamy and hearty recipe? Try our Garlic Parmesan Chicken Pasta for dinner before dessert.
Step-by-Step Guide to Making the Ice Cream Base
- Whisk the Ingredients:
- In a mixing bowl, whisk together the heavy cream, whole milk, and granulated sugar until the sugar is fully dissolved.
- Add Vanilla Extract:
- Stir in the vanilla extract for a subtle but essential flavor boost.
- Optional Cream Cheese Mixture:
- If using cream cheese, beat it separately until smooth, then fold it into the base. This adds a rich, tangy note reminiscent of traditional red velvet cake frosting.
- Chill the Mixture:
- Cover the bowl and refrigerate for at least 2–4 hours, or overnight for best results. A cold base ensures a smooth texture when churned.
Churning the Ice Cream
- Prepare Your Ice Cream Maker:
- Follow the manufacturer’s instructions to set up your machine.
- Pour in the Base:
- Slowly pour the chilled ice cream base into the ice cream maker.
- Churn to Perfection:
- Allow the machine to churn the mixture until it reaches a soft-serve consistency. This typically takes 20–30 minutes, depending on your equipment.
Tips for a Perfect Ice Cream Base
- Consistency Matters: The cream-to-milk ratio is critical for achieving the right balance of richness and texture.
- Chill Everything: Keep your ingredients and equipment cold to avoid ice crystals forming during the process.
Adding the Red Velvet Cake
Incorporating Red Velvet Cake into Your Ice Cream
The red velvet cake is the star of this recipe, adding texture and a rich chocolatey flavor to the creamy ice cream base.
Preparing the Cake for the Ice Cream
- Bake or Use Pre-Made Cake:
- If baking, follow your favorite red velvet cake recipe. Ensure the cake is fully cooled before adding it to the ice cream.
- Alternatively, store-bought red velvet cake works perfectly for convenience.
- Crumb or Cube the Cake:
- Tear the cake into small bite-sized pieces or crumble it into fine chunks for easy incorporation into the ice cream.
- Reserve some larger pieces for a decorative topping if desired.
Looking for another creamy and hearty recipe? Try our Garlic Parmesan Chicken Pasta for dinner before dessert.
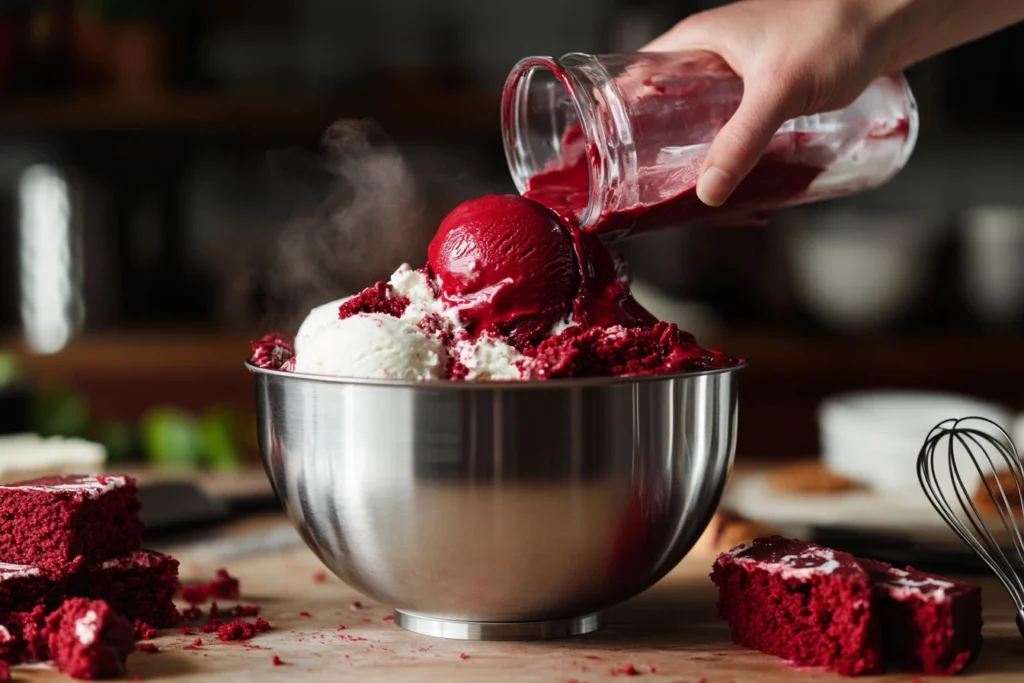
Blending the Cake with the Ice Cream Base
- Add Cake Mid-Churn:
- Once the ice cream base reaches a semi-frozen consistency in the ice cream maker, gradually add the crumbled cake.
- Let the churning process evenly distribute the cake pieces.
- Layer for Visual Appeal:
- For a marbled effect, alternate layers of the ice cream base and crumbled cake in a storage container. Use a spoon to gently swirl the layers.
- Avoid Over-Mixing:
- Ensure the cake pieces remain intact for added texture by gently mixing them in without overworking the base.
Freezing for Final Texture
- Transfer to a Freezer-Safe Container:
- Scoop the churned ice cream into a container with a tight-fitting lid.
- Freeze Completely:
- Allow the ice cream to firm up in the freezer for at least 4–6 hours or overnight for the best scoopable consistency.
- Garnish Before Serving:
- Sprinkle some extra cake crumbs or add a dollop of cream cheese frosting on top for added flair.
Tips for Incorporating Cake into Ice Cream
- Balance the Ratios: Avoid adding too much cake, as it may affect the creamy texture. Aim for a balance between cake chunks and the ice cream base.
- Keep the Cake Moist: Ensure the cake pieces remain soft by lightly brushing them with simple syrup if they feel dry.
Customizing Your Red Velvet Cake Ice Cream
Creative Variations to Elevate Your Ice Cream
While the classic red velvet cake ice cream is already a delight, there are countless ways to make it uniquely yours.
Flavor Enhancements
- Add a Chocolate Twist
- Mix in mini chocolate chips or drizzle melted dark chocolate for an extra chocolatey bite.
- Use a chocolate swirl instead of vanilla in the base for a richer, layered flavor.
- Infuse with Vanilla or Almond
- Add a splash of vanilla extract or almond essence to enhance the red velvet cake’s signature flavor.
- Incorporate Citrus Zest
- A touch of orange or lemon zest can bring brightness to the ice cream while complementing the richness of the cake.
Alternative Toppings and Mix-Ins
- Toppings
- Crushed Oreo cookies for a crunchy, chocolaty layer.
- Cream cheese frosting dollops for an authentic red velvet experience.
- Red and white sprinkles to match the theme.
- Mix-Ins
- Swirl in raspberry or strawberry jam for a fruity note.
- Add candied nuts like pecans or walnuts for a nutty crunch.
Dietary Adjustments
- Low-Calorie Options
- Use a low-fat ice cream base and reduce the amount of sugar.
- Replace full-fat cream with coconut milk or almond milk for a lighter alternative.
- Vegan Version
- Swap dairy-based ingredients with coconut cream or oat milk.
- Use vegan red velvet cake and dairy-free cream cheese for authenticity.
- Gluten-Free Variation
- Use a gluten-free red velvet cake mix or bake your own using almond or coconut flour.
Presentation Ideas
- Layered Ice Cream Cake
- Stack layers of ice cream and red velvet cake into a frozen dessert masterpiece.
- Ice Cream Sandwiches
- Scoop ice cream between two red velvet cookies for a handheld treat.
- Elegant Sundae
- Serve in a glass bowl, topped with whipped cream, chocolate syrup, and cake crumbs.
Hosting Tips for Serving Red Velvet Cake Ice Cream
- Perfect for Parties
- Serve in pre-scooped portions or individual cups for easy serving at events.
- Seasonal Themes
- Incorporate heart-shaped cake chunks for Valentine’s Day or festive sprinkles for holidays.
- Pair with Beverages
- Offer alongside coffee, hot chocolate, or a refreshing iced tea for the ultimate dessert pairing.
Storing and Maintaining Red Velvet Cake Ice Cream
Proper Storage Techniques for Homemade Ice Cream
Preserving the texture and flavor of your red velvet cake ice cream is essential for enjoying it at its best.
Storing the Ice Cream
- Use Airtight Containers
- Transfer the ice cream into a freezer-safe, airtight container to prevent freezer burn.
- Avoid plastic wrap as it may not seal the flavor effectively.
- Smooth the Surface
- Level the surface of the ice cream and cover it with a layer of parchment paper or plastic wrap to minimize air exposure.
- Label and Date
- Write the preparation date on the container to track freshness.
For tips on freezing and meal prepping other recipes, check out our Chicken Shepherd’s Pie guide.
Freezing Tips
- Ideal Freezing Temperature
- Keep your freezer set at 0°F (-18°C) for optimal storage.
- Avoid Temperature Fluctuations
- Store the ice cream towards the back of the freezer where the temperature is most stable.
- Cooling Before Freezing
- If freshly churned, let the ice cream cool to room temperature before freezing to avoid ice crystals.
Shelf Life of Red Velvet Cake Ice Cream
- Homemade Ice Cream
- Best consumed within 2–3 weeks for optimal flavor and texture.
- Signs of Spoilage
- Look for ice crystals, freezer burn, or a change in flavor and texture.
Tips for Reusing Leftovers
- Ice Cream Shakes
- Blend leftover ice cream with milk for a creamy red velvet cake milkshake.
- Ice Cream Pie
- Use softened ice cream as a filling for a cookie crust pie, topped with whipped cream and cake crumbs.
- Creative Desserts
- Layer the ice cream with brownies or cookies for a quick trifle.
Reviving Frozen Ice Cream
- Softening Safely
- Let the ice cream sit at room temperature for 5–10 minutes before scooping.
- Avoid Microwaving
- Using a microwave may melt the outer layer while leaving the center too firm, resulting in an inconsistent texture.
- Use a Hot Scoop
- Dip your ice cream scoop in warm water for clean and smooth scoops.
Frequently Asked Questions (FAQs)
Common Questions About Red Velvet Cake Ice Cream
Can I Make Red Velvet Cake Ice Cream Without an Ice Cream Maker?
Yes, you can!
- No-Churn Method
- Whisk heavy cream until soft peaks form.
- Fold in sweetened condensed milk, vanilla extract, and cake crumbs.
- Pour into a freezer-safe container and freeze for 6 hours.
- Blender Technique
- Blend frozen cake chunks with heavy cream and condensed milk.
- Freeze the mixture until set.
What Makes Red Velvet Cake Unique in Ice Cream?
- Signature Flavors: The combination of cocoa powder, buttermilk, and cream cheese frosting gives the ice cream a tangy, sweet, and chocolatey flavor.
- Vibrant Red Color: Achieved through natural food coloring or beetroot powder.
- Cake Textures: Cake chunks add a delightful chewy contrast to the creamy base.
Can I Use Store-Bought Red Velvet Cake for This Recipe?
Absolutely! Using store-bought cake can save time:
- Freshness Tip
- Ensure the cake is fresh to maintain its texture and flavor.
- Crumb Preparation
- Cut the cake into small pieces or crumble it before folding into the ice cream.
How Do I Prevent Ice Crystals in Homemade Ice Cream?
- Chill Ingredients
- Ensure all ingredients are cold before mixing.
- Proper Storage
- Use an airtight container with minimal air exposure.
- Add Stabilizers
- Ingredients like corn syrup or alcohol can help prevent ice crystal formation.
Can I Customize the Recipe for Dietary Preferences?
- Vegan Version
- Use coconut milk or almond milk as a base.
- Replace cream cheese frosting with a dairy-free alternative.
- Low-Sugar Option
- Substitute regular sugar with a natural sweetener like stevia or erythritol.
- Gluten-Free Version
- Use gluten-free red velvet cake for inclusions.
How Do I Serve Red Velvet Cake Ice Cream Creatively?
- Ice Cream Sandwiches
- Place scoops between two red velvet cookies.
- Dessert Bowls
- Serve in a waffle cone bowl and garnish with cream cheese drizzle.
- Ice Cream Sundae
- Add whipped cream, sprinkles, and extra cake crumbs on top.
Tips for Storing and Serving Red Velvet Cake Ice Cream
Best Practices for Storing Homemade Ice Cream
Choosing the Right Container
- Airtight Containers
- Opt for containers with a tight seal to prevent air exposure.
- Avoid Plastic Wrap Alone
- Plastic wrap can lead to freezer burn unless paired with a container.
How to Minimize Freezer Burn
- Fill to the Top
- Avoid leaving air space in the container.
- Wrap in Foil or Wax Paper
- Add an extra layer to block freezer air.
Ideal Freezing Time for Freshness
- Short-Term Storage
- Consume within two weeks for optimal flavor and texture.
- Label and Date
- Mark the date to track its freshness.
Creative Serving Suggestions
Elegant Presentation Ideas
- Single-Serve Glassware
- Use martini or parfait glasses for a sophisticated touch.
- Layered Desserts
- Alternate scoops of red velvet ice cream with whipped cream and red velvet cake crumbles in a clear glass.
Adding Toppings for Extra Flavor
- Cream Cheese Drizzle
- Melt cream cheese frosting and drizzle over the ice cream.
- Chocolate Chips or Shavings
- Sprinkle dark chocolate for a rich contrast.
- Fresh Fruit Garnish
- Add raspberries or strawberries for a tangy complement.
Pairing with Desserts
- Red Velvet Cake Pairing
- Serve alongside a slice of red velvet cake for double indulgence.
- Cookie Sandwiches
- Use soft red velvet cookies to create a sandwich.
Making It a Showstopper for Special Occasions
- Themed Parties
- Add edible glitter for a festive look during celebrations.
- Seasonal Twists
- Serve during Valentine’s Day with heart-shaped garnishes.
Conclusion
The Sweet Charm of Red Velvet Cake Ice Cream
The combination of red velvet cake and creamy homemade ice cream creates a dessert that’s both indulgent and nostalgic. This recipe allows you to enjoy the rich flavor of the classic red velvet cake in a refreshing, velvety ice cream form. Whether served in cones, bowls, or turned into popsicles, it’s a treat that pleases all ages.
From understanding the history of red velvet to mastering the steps of creating this frozen delight, you now have everything you need to recreate this dessert at home. Remember, this recipe is endlessly customizable—whether you want to add chocolate chips, swap out the frosting, or create a dairy-free version, the possibilities are boundless.
The beauty of red velvet cake ice cream lies not just in its luxurious taste but also in its ability to be a show-stopping dessert for any occasion. Whether you’re entertaining guests or simply treating yourself, this recipe will never fail to impress. So, gather your ingredients, let your creativity shine, and relish every bite of this delectable dessert.
Happy ice cream-making!
1 thought on “Indulgent Red Velvet Cake Ice Cream Recipe: A Decadent Treat”
Comments are closed.