
Introduction
If you’ve ever wondered how to cook a turkey in an electric roaster, this guide will walk you through every step for perfect results.
Cooking a turkey for the holidays or special occasions can feel daunting, but learning how to cook a turkey in an electric roaster makes it much simpler. This method ensures even cooking, juicy meat, and frees up your oven for other dishes. Whether you’re new to electric roasters or looking to refine your technique, this guide has everything you need. From selecting the perfect turkey to achieving a golden, crispy finish, we’ll cover each step in detail. Let’s dive into the process, starting with understanding what makes electric roasters such a convenient choice.
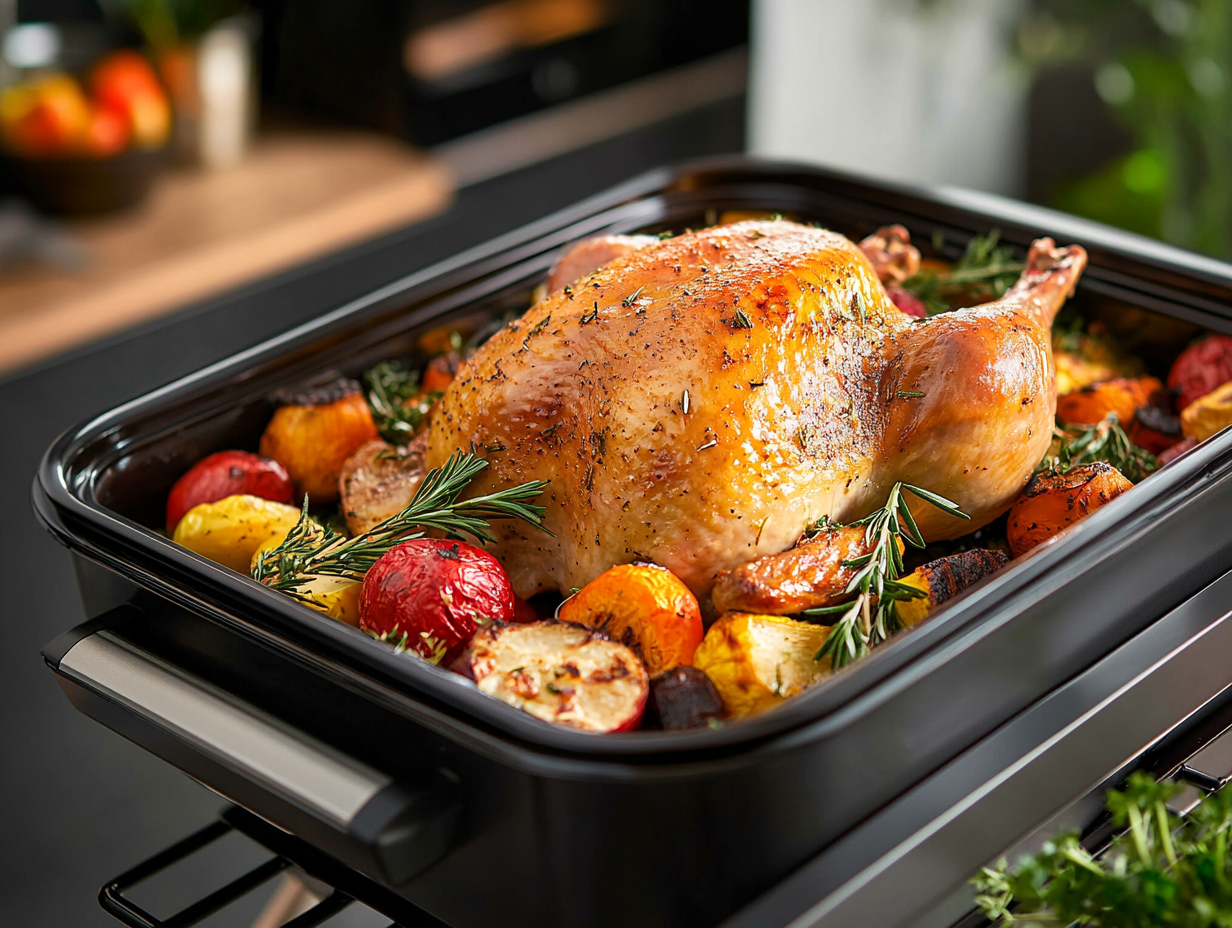
For additional roasted poultry ideas, check out our Roast Chicken with Vegetables recipe for a delicious and simple alternative.
Understanding Electric Roasters
What Is an Electric Roaster and Why Is It Perfect for Cooking Turkey?
An electric roaster is a countertop appliance that works like a portable oven. It uses a self-contained heating element to cook food evenly and efficiently. The key advantage is its ability to maintain moisture, making it ideal for cooking large cuts of meat like turkey. Plus, it frees up your conventional oven, giving you more flexibility during meal preparation.
Advantages of Learning How to Cook a Turkey in an Electric Roaster
- Moisture Retention: The enclosed design helps lock in moisture, resulting in a juicy turkey every time.
- Energy Efficiency: Electric roasters use less energy compared to traditional ovens, which is both cost-effective and environmentally friendly.
- Space-Saving: With the oven free for side dishes and desserts, meal prep becomes a breeze.
- Ease of Use: Most models have simple temperature controls, making it easy for anyone to cook a perfect turkey.
If you’re looking for more holiday main courses, our Honey Pineapple Baked Chicken Recipe is a flavorful alternative.
Selecting and Preparing Your Turkey
When learning how to cook a turkey in an electric roaster, choosing the right size turkey is crucial for even cooking and best results.
Choosing the Right Turkey Size for an Electric Roaster
1. Matching Turkey Size to Roaster Capacity
- Check the size of your electric roaster. Most models can accommodate turkeys up to 18–20 pounds. For larger birds, you may need to use a traditional oven.
- For smaller gatherings, a 12–14 pound turkey is ideal and ensures even cooking.
2. Calculating Servings
- Plan for about 1 to 1.5 pounds of turkey per person. This accounts for both the cooked meat and bones.
Thawing the Turkey Safely
1. Refrigerator Thawing
- Place the turkey in its original packaging on a tray to catch any drips.
- Thaw in the refrigerator at a rate of 24 hours for every 4–5 pounds of turkey. For example, a 16-pound turkey will take about 3–4 days to thaw.
2. Cold Water Thawing
- Submerge the turkey (still in its packaging) in cold water.
- Change the water every 30 minutes to maintain a safe temperature.
- Thaw at a rate of 30 minutes per pound, so a 16-pound turkey will take about 8 hours.
Brining the Turkey
1. Benefits of Brining
- Brining enhances flavor and ensures a juicy turkey. It involves soaking the turkey in a saltwater solution infused with herbs and spices.
2. Brining Instructions
- Ingredients: 1 gallon water, 1 cup kosher salt, 1/2 cup sugar, fresh herbs (rosemary, thyme), and garlic.
- Dissolve the salt and sugar in water, add herbs, and submerge the turkey completely.
- Brine in the refrigerator for 12–24 hours. Rinse the turkey thoroughly and pat dry before cooking.
Preparing the Turkey for Roasting
Now that your turkey is thawed and brined, it’s time to prepare it for the electric roaster. Proper seasoning, stuffing decisions, and trussing are key steps to ensure a delicious, evenly cooked bird.
Seasoning Options
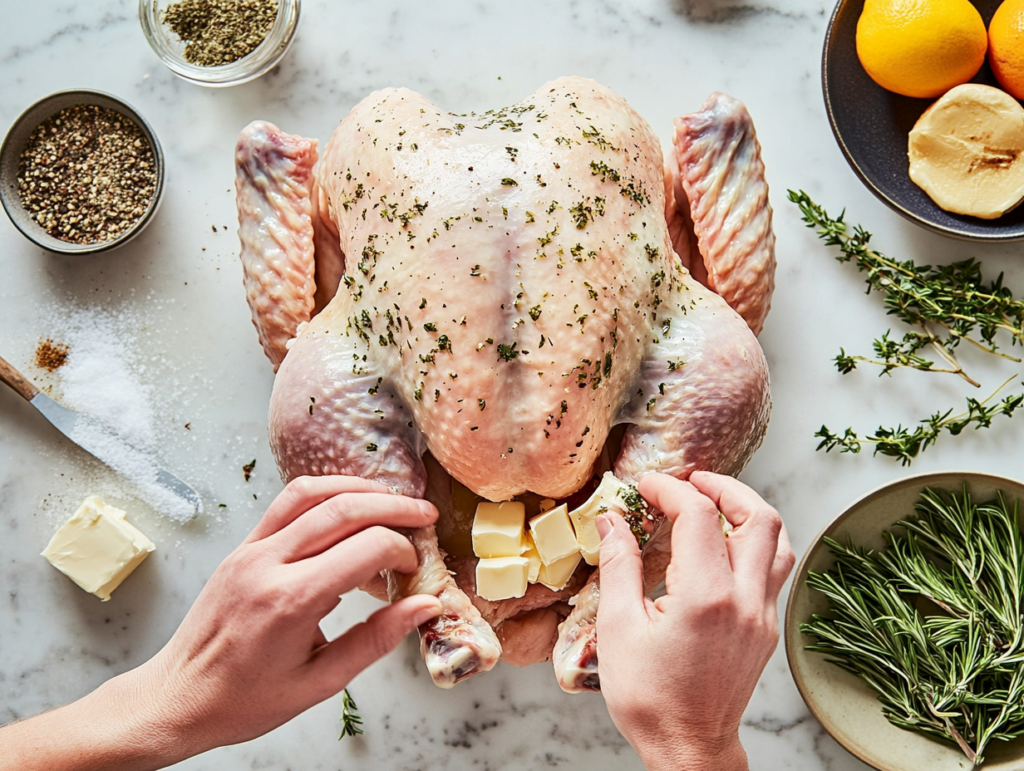
1. Herb Butter Under the Skin
- Why: Spreading herb butter under the turkey skin locks in moisture and infuses the meat with rich flavor.
- How To:
- Combine softened butter, minced garlic, fresh herbs (rosemary, thyme, sage), salt, and pepper.
- Carefully loosen the skin on the turkey breast using your fingers and spread the herb butter evenly underneath.
2. Dry Rub
- For a simpler option, coat the turkey with a blend of spices like paprika, garlic powder, onion powder, salt, and pepper. Rub this mixture generously all over the bird.
3. Marinades or Injectables
- Use a flavor injector to infuse the meat with marinades such as citrus, garlic, or Cajun flavors. This step ensures the turkey is flavorful all the way through.
Stuffing: To Stuff or Not to Stuff
1. The Pros and Cons
- Pros: Cooking the stuffing inside the turkey adds rich flavor to the bread and ingredients.
- Cons: Increases cooking time and may result in unevenly cooked stuffing or turkey.
2. Alternative Option
- Cook stuffing separately to ensure it’s properly cooked and serve alongside the turkey. Instead, fill the turkey cavity with aromatics like halved lemons, onions, garlic, and fresh herbs for flavor.
Trussing the Turkey
1. Why Trussing Is Important
- Trussing ensures the turkey cooks evenly by keeping the legs and wings close to the body, preventing them from drying out.
2. Simple Trussing Technique
- Cross the legs and tie them together with kitchen twine.
- Tuck the wing tips underneath the turkey to prevent burning.
Cooking the Turkey in an Electric Roaster
Understanding cooking times and temperatures is a key part of mastering how to cook a turkey in an electric roaster.
Preheating the Roaster
- Set the Temperature: Preheat your electric roaster to 325°F (163°C).
- Allow Ample Time: Let the roaster preheat for at least 15 minutes with the lid on. This ensures the cavity is evenly heated before placing the turkey inside.
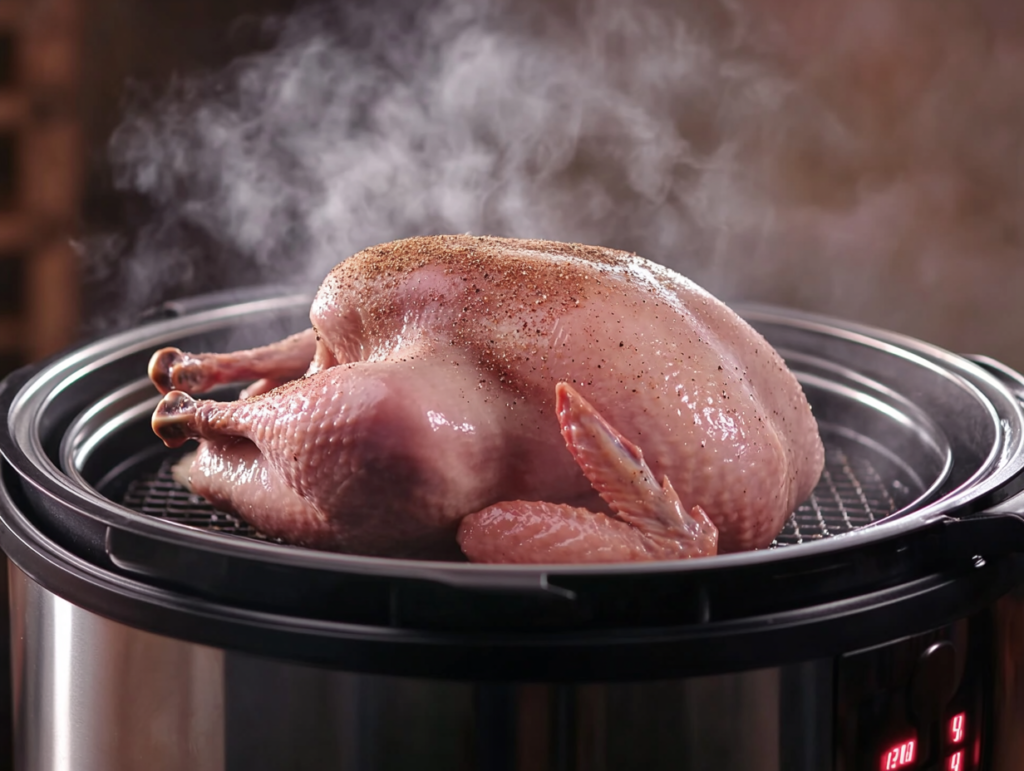
Placing the Turkey in the Roaster
- Use a Roasting Rack: Place a roasting rack inside the roaster to elevate the turkey. This prevents it from sitting in its juices and promotes even cooking.
- Positioning the Turkey: Set the turkey breast-side up on the rack. For extra moisture, you can add a small amount of water, broth, or aromatics (like celery, onion, and herbs) to the bottom of the roaster.
Cooking Times and Temperatures
- General Guidelines:
- For unstuffed turkey: 15 minutes per pound at 325°F.
- For stuffed turkey: 16–17 minutes per pound at 325°F.
- Internal Temperature Check:
- Insert a meat thermometer into the thickest part of the breast or thigh (avoiding the bone).
- The turkey is done when the internal temperature reaches 165°F (74°C) for the breast and 170–175°F (77–79°C) for the thigh. If stuffed, the center of the stuffing should also reach 165°F (74°C).
Basting and Monitoring
- Basting Recommendations:
- Many electric roasters retain moisture well, making basting optional. However, if desired, baste the turkey every 30 minutes using pan juices or melted butter.
- Minimize Heat Loss:
- Avoid opening the lid too often, as this can reduce the temperature and extend cooking time.
Post-Cooking Procedures
Once the turkey is cooked to perfection in the electric roaster, there are a few essential steps to ensure it’s ready to serve. Proper resting, carving, and using drippings for gravy can elevate your dish from good to unforgettable.
Resting the Turkey
- Why Resting Is Crucial:
- Resting allows the juices to redistribute within the meat, resulting in tender and moist slices.
- Skipping this step can lead to dry meat as the juices escape during carving.
- How to Rest the Turkey:
- Remove the turkey from the roaster and place it on a cutting board.
- Tent it loosely with aluminum foil and let it rest for 20–30 minutes. This also keeps it warm while you prepare other dishes.
Carving the Turkey
- Tools You’ll Need:
- A sharp carving knife or electric carving knife.
- A large fork for stability.
- A cutting board with a groove to catch juices.
- Step-by-Step Carving Guide:
- Remove the Legs and Thighs: Cut through the joint where the leg meets the body and separate the drumstick and thigh.
- Carve the Breast Meat: Slice along the breastbone and cut thin slices across the grain.
- Separate the Wings: Cut through the wing joints for easy removal.
- Carve the Thighs: Slice the thigh meat into smaller pieces for serving.
Making Gravy from the Drippings
- Collect the Drippings:
- Carefully pour the drippings from the roaster into a fat separator or bowl. Skim off excess fat.
- Simple Gravy Recipe:
- Ingredients: Drippings, 2 tablespoons of flour, 1 cup of broth (turkey or chicken), salt, and pepper.
- In a saucepan, whisk the flour into the drippings over medium heat until smooth. Gradually add broth, stirring constantly, until thickened. Season with salt and pepper to taste.
Serving and Storing Leftovers
Now that your turkey is cooked, rested, and carved, it’s time to plate it beautifully and consider how to store leftovers safely for future meals. Here are tips to serve and preserve your delicious electric roaster turkey.
Serving Suggestions
1. Plating the Turkey
- Arrange carved turkey pieces on a large serving platter, grouping the dark and white meat separately for easy selection.
- Garnish with fresh herbs like rosemary, thyme, or parsley for a pop of color. Add lemon or orange slices for a festive touch.
2. Perfect Side Dishes
- Pair your turkey with classic sides like:
- Creamy mashed potatoes and gravy.
- Green bean casserole or roasted Brussels sprouts.
- Cranberry sauce for a sweet and tangy complement.
For a sweet breakfast treat, pair your turkey dinner leftovers with our Cream Cheese Stuffed French Toast Recipe.
3. Beverage Pairings
- Serve with sparkling water infused with citrus or a warm apple cider to round out the flavors.
Storing Leftovers Safely
1. Cooling the Turkey
- Allow leftovers to cool to room temperature (but no longer than 2 hours after cooking).
- Slice the turkey meat off the bones for easier storage.
2. Proper Storage
- Refrigeration: Store turkey in airtight containers or zip-top bags. Use within 3–4 days.
- Freezing: Wrap turkey pieces tightly in plastic wrap, then place them in freezer-safe bags. Frozen turkey can last up to 3 months.
3. Reheating Leftovers
- Oven Method: Preheat the oven to 325°F (163°C). Place turkey slices in a baking dish with a splash of broth or gravy, cover with foil, and heat for 20–30 minutes.
- Microwave Method: Heat in short intervals, covered, to prevent drying out.
- Stovetop Method: Warm turkey in a skillet with a bit of broth for added moisture.
Frequently Asked Questions (FAQs)
Do you need to add water when learning how to cook a turkey in an electric roaster? Here’s the answer to ensure perfect moisture levels.
1. How long does it take to cook a turkey in an electric roaster?
- Cooking time depends on the turkey’s weight:
- Unstuffed: 15 minutes per pound at 325°F (163°C).
- Stuffed: 16–17 minutes per pound at 325°F (163°C).
- Always use a meat thermometer to check for doneness:
- Breast: 165°F (74°C).
- Thigh: 170–175°F (77–79°C).
- Stuffing (if applicable): 165°F (74°C).
2. Do I need to add water to the bottom of the electric roaster?
- No, it’s not necessary. Electric roasters are designed to retain moisture naturally. Adding water can dilute the drippings, which are essential for making flavorful gravy.
- If you want extra aromatics, you can place celery, onions, and herbs in the bottom of the roaster instead.
3. Can I use the electric roaster for other dishes while the turkey is cooking?
- It’s best to dedicate the roaster to the turkey to avoid uneven cooking or flavor mixing.
- If your roaster is large enough, you can roast vegetables alongside the turkey in a separate pan or foil pouch.
4. How do I achieve crispy skin on the turkey using an electric roaster?
- For crispy skin:
- Dry the turkey thoroughly with paper towels before seasoning.
- Brush the skin with melted butter or oil before placing it in the roaster.
- For extra crispiness, finish the turkey under the broiler in your oven for 3–5 minutes after it’s cooked.
5. How do I clean and maintain my electric roaster?
- Allow the roaster to cool completely before cleaning.
- Remove the roasting pan and rack, and wash them with warm, soapy water.
- Wipe the interior and heating element with a damp cloth—do not immerse the main unit in water.
6. Can I cook a frozen turkey in an electric roaster?
- It’s not recommended. Cooking a frozen turkey takes much longer, and the uneven thawing can result in undercooked or dry sections. Always thaw the turkey completely before roasting.
Additional Tips and Tricks
Cooking a turkey in an electric roaster can be simple and stress-free, but a few expert tips and tricks can elevate your results even further. These suggestions will help ensure your turkey is juicy, flavorful, and beautifully presented.
Enhancing Flavor with Aromatics
- Inside the Turkey:
- Fill the cavity with aromatics like halved lemons, oranges, garlic, onions, and fresh herbs such as rosemary, thyme, and sage. These ingredients will infuse the meat with subtle, savory notes as it cooks.
- Under the Rack:
- Place chopped vegetables, garlic, and herbs in the bottom of the roaster instead of water. This creates flavorful drippings for gravy and a rich aroma during cooking.
Making Gravy from Roaster Drippings
- Collect the Drippings:
- Once the turkey is cooked, carefully pour the drippings from the bottom of the roaster into a bowl or fat separator. Skim off excess fat.
- Quick Gravy Recipe:
- Ingredients: Turkey drippings, 2 tablespoons flour, 1 cup broth, and salt and pepper to taste.
- In a saucepan over medium heat, whisk the flour into the drippings to form a smooth paste. Gradually add broth, whisking continuously until thickened. Adjust seasoning as needed.
Crispy Skin Secrets
- Dry the Skin Thoroughly:
- Before seasoning, pat the turkey skin completely dry with paper towels to help it crisp up.
- Broil for Extra Crispiness:
- Once the turkey is fully cooked, transfer it to the oven and broil for 3–5 minutes at high heat. Keep a close eye to avoid burning.
Cleaning and Maintaining Your Electric Roaster
- Post-Cooking Cleanup:
- Allow the roaster to cool completely. Remove the inner pan and roasting rack, and wash them with warm, soapy water. Wipe the heating element with a damp cloth.
- Regular Maintenance:
- Avoid using abrasive sponges to preserve the roaster’s non-stick surface. Store the roaster in a cool, dry place to maintain its functionality.
Experimenting with Turkey Variations
- Herb-Crusted Turkey:
- Create a crust using a mixture of finely chopped fresh herbs, garlic, butter, and breadcrumbs. Apply this mixture over the skin for an extra layer of flavor.
- Spiced Turkey:
- Add bold spices like smoked paprika, cumin, and cayenne to your seasoning blend for a smoky, spicy twist.
Conclusion
Cooking a turkey in an electric roaster is a game-changer for anyone hosting a holiday meal or special gathering. This method not only frees up your oven for side dishes but also ensures a juicy, evenly cooked turkey with minimal effort.
By following the steps in this guide—from choosing the right turkey and preparing it with flavorful seasonings to cooking it to perfection and creating delicious gravy—you can impress your guests with a show stopping centerpiece. With the added benefits of easy cleanup and space-saving convenience, the electric roaster proves to be an indispensable tool for stress-free meal preparation.
Whether you’re a seasoned cook or a beginner, mastering how to cook a turkey in an electric roaster will make your next holiday meal a memorable success. Now it’s your turn—gather your ingredients, follow these steps, and enjoy the delicious results!
Let me know if you need help with additional content, visuals, or recipe card formatting to accompany this article! 😊
For more ideas and recipes, explore our Honey Pineapple Baked Chicken Recipe or Roast Chicken with Vegetables. Happy cooking!
1 thought on “How to Cook a Turkey in an Electric Roaster: A Complete Guide”
Comments are closed.